Queue Workload Board
See who is carrying how much support work, spot overload before service is affected, and rebalance Cases across users, teams, and queues.
See and balance team workload
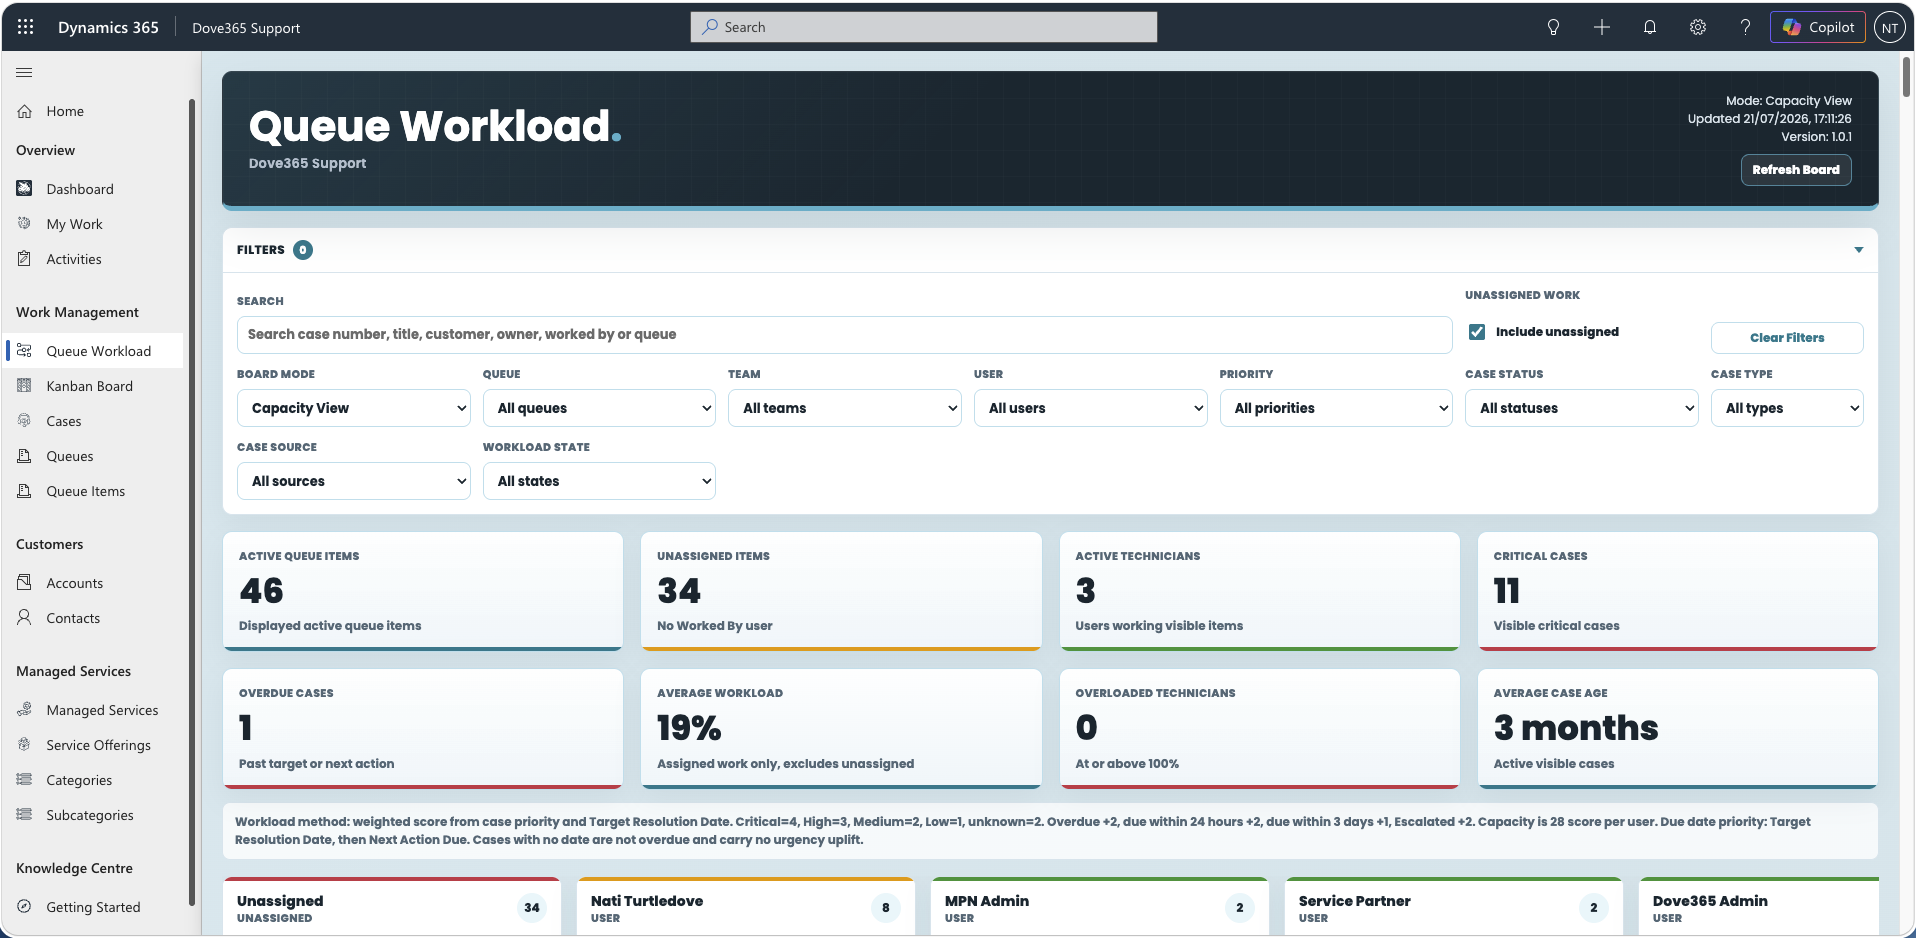
The Dove365 Support Queue Workload Board shows who is carrying how much support work, where that work is queued, and which Cases are at risk. It is a balancing tool: use it to see load across the team, then move work to the right person or queue by dragging a card or using the buttons on the card.
The board is opened inside the Dove365 Support model-driven app and uses the signed-in user's Dataverse permissions.
The Queue Workload Board is not the same as the Kanban Board. The Kanban Board organises Cases by working state. The Queue Workload Board organises the same queue work by who owns the load.
Queue membership
Queue membership controls almost everything on this board. Read this section before using the board.
To assign or route work to a user, that user must have an active queue of their own, and they must be a member of it. Dove365 Support routes the Queue Item into the target user's queue and then sets Worked By. If the user has no queue that Dove365 Support can find, the Case stays in its current queue and only Worked By is set. The user will be named on the Case but the work will not appear in their queue.
You must also be a member of the queues you want to manage. The board only loads work from public queues, queues you are a member of, and the configured default queue. Work sitting in a queue you are not a member of will not appear, so you cannot drag it anywhere.
- No queue for the target user means no routing.
- No membership for you means no visibility.
- No visibility means no assignment.
Ask your support admin to confirm queue setup before reporting a problem with assignment.
When to use the Queue Workload Board
- See how much work each technician is carrying.
- Find who is available to take another Case.
- Spot technicians who are overloaded before service is affected.
- Rebalance work by moving Cases between users, teams, or queues.
- Clear a backlog of unassigned work in the default triage queue.
- Review workload by queue or by team rather than by person.
Board modes
Board mode changes what each lane represents. All four modes show the same underlying queue work.
By User
One lane per user who is currently working visible items, plus an Unassigned lane. Use this mode for day-to-day allocation.
By Team
One lane per support team that has visible work, plus an Unassigned lane. A Case counts towards a team when the Worked By user or the Case owner is a member of that team. Teams are identified automatically: Dove365 Support includes owner teams whose name contains support, service, helpdesk, or queue, plus any team that owns a queue you can see.
By Queue
One lane per queue that currently holds visible work. Use this mode to see how work is distributed across intake and specialist queues rather than across people.
Capacity View
The same lanes as By User, but every active user is shown even when they are carrying no work, and lanes are ordered by capacity used rather than by name. Use this mode when you are looking for spare capacity.
This is the default mode. The board opens in Capacity View so the busiest technicians appear first and idle technicians are visible rather than hidden.
Filtering the board
The filter panel appears above the summary tiles. Select the Filters header to collapse or expand the panel; collapsing it frees vertical space without changing any filter you have set. A number beside the Filters heading shows how many filters are currently applied. Board mode is not counted, because it changes how work is grouped rather than which work is shown. The panel opens expanded each time the board is loaded.
- Search: Case number, Case title, customer, queue name,
Worked Byuser, Case owner, priority, status, type, and source. - Include unassigned: clear this box to hide work that has no
Worked Byuser. - Board mode: By User, By Team, By Queue, or Capacity View.
- Queue: limits the board to work in one queue.
- Team: limits the board to work belonging to members of one team.
- User: limits the board to work with one
Worked Byuser. - Priority, Case status, Case type, and Case source: limit the board by those Case values.
- Workload state: limits the board to lanes in a matching state, such as
Overloaded.
Select Clear Filters to reset every filter and return to Capacity View. Filters apply to the whole board: the summary tiles, the lanes, and the workload percentages all reflect the current filters.
Workload state and the triage lanes
Workload state filters lanes rather than cards. Selecting Overloaded, for example, hides the lanes that are not overloaded; it does not remove cards from the lanes that remain.
The Unassigned lane and the default triage queue lane are always shown, whatever Workload state is set to. Those lanes hold work that belongs to nobody yet, so they are the place you drag work from.
Summary tiles
Eight tiles sit above the board and describe the filtered view.
- Active Queue Items: number of active queue items currently displayed.
- Unassigned Items: displayed items with no
Worked Byuser. - Active Technicians: distinct users working the displayed items.
- Critical Cases: displayed Cases at Critical priority.
- Overdue Cases: displayed Cases past their due date.
- Average Workload: average capacity used across the working lanes.
- Overloaded Technicians: user lanes at or above 100 per cent capacity.
- Average Case Age: average time since the displayed Cases were created.
Average Workload deliberately excludes the Unassigned lane and the default triage queue lane. Unassigned work belongs to nobody, so including it would understate how loaded the team actually is.
How workload is calculated
Dove365 Support does not use estimated or allocated hours. Each Case is given a workload score built from its priority and its Target Resolution Date.
Starting score, from Case priority:
- Critical: 4
- High: 3
- Medium: 2
- Low: 1
- No priority set: 2
Urgency is then added from the date. Only one date uplift is applied to a Case.
- Past the date, so overdue: +2
- Due within 24 hours: +2
- Due within 3 days: +1
- Due later, or no date set: +0
Escalated Cases add a further 2. A worked example: a High priority Case that is overdue and escalated scores 3 + 2 + 2, giving 7.
The date used is the Case Target Resolution Date. Where a Case has no target resolution date, Dove365 Support falls back to Next Action Due so the Case is not treated as risk-free. A Case with neither date is never overdue and receives no urgency uplift.
The method note printed under the summary tiles always shows the values actually in use.
How capacity is calculated
Each user lane is measured against a capacity of 28 workload score. The percentage shown on the lane is the total score of the Cases in that lane against that capacity.
- Below 60 per cent: Available
- 60 to 79 per cent: Healthy
- 80 to 99 per cent: Busy
- 100 per cent or above: Overloaded
- No capacity set: Capacity Unknown
This state is the single measure of how loaded a lane is. It appears in the lane header, drives the lane colour, and is what the Workload state filter matches on. Lane colour follows the state: green for Available, amber for Busy, red for Overloaded.
Team lanes are measured against 28 score for each team member, so a five-person team has a capacity of 140.
Capacity is a guide to relative load, not a contractual measure of a person's working hours.
Lanes and Case cards
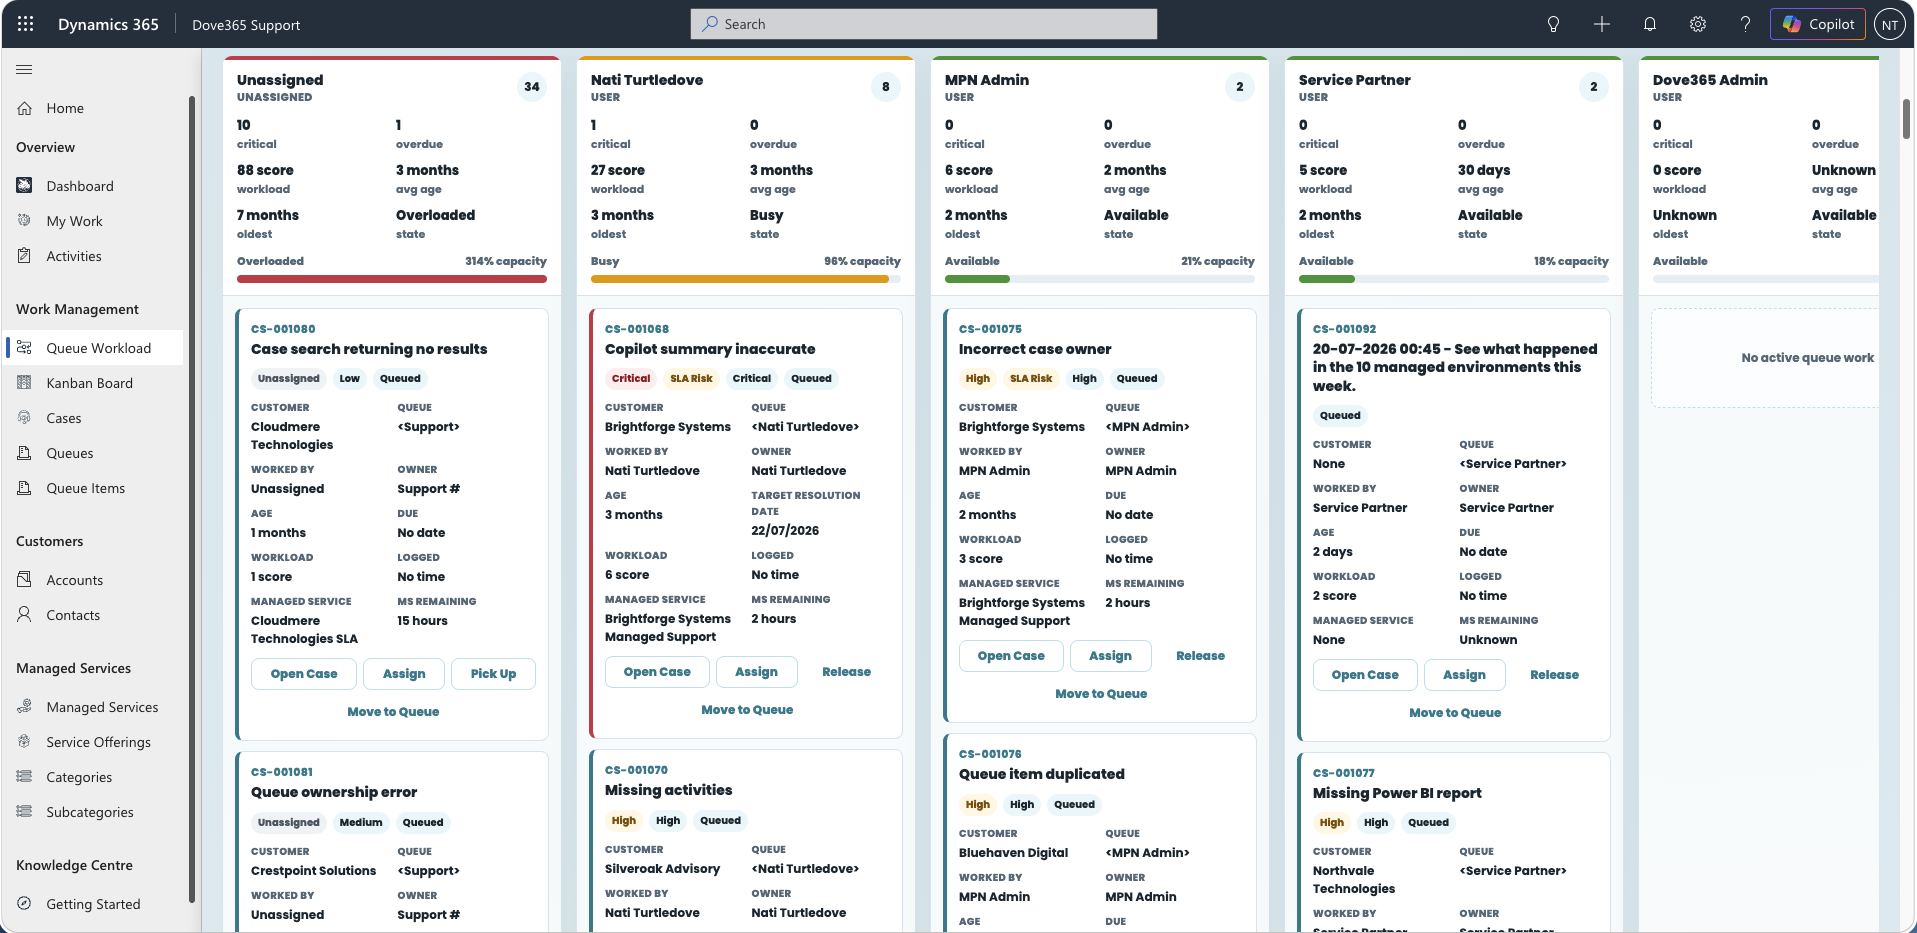
Each lane header shows the lane name and lane type, item count, critical and overdue counts, total workload score, average and oldest Case age, workload state, and capacity used with a progress bar. The Unassigned lane is always shown first, followed by the default triage queue where that lane is displayed.
Each card represents one active Queue Item and the Case behind it. Cards show the Case number, Case title, next action, and a row of badges for Critical, High, Overdue, Escalated, Unassigned, SLA Risk, priority, and status. Cards with a red left edge are Critical. Cards with a red outline are overdue.
Card details include:
- Customer, queue,
Worked By, and owner. - Age.
- Target Resolution Date, or Next Action Due where no target date is set.
- Workload score.
- Time logged against the Case.
- Managed Service and remaining Managed Service hours.
Card buttons are Open Case, Assign, Pick Up (unassigned work only), Release (assigned work only), and Move to Queue.
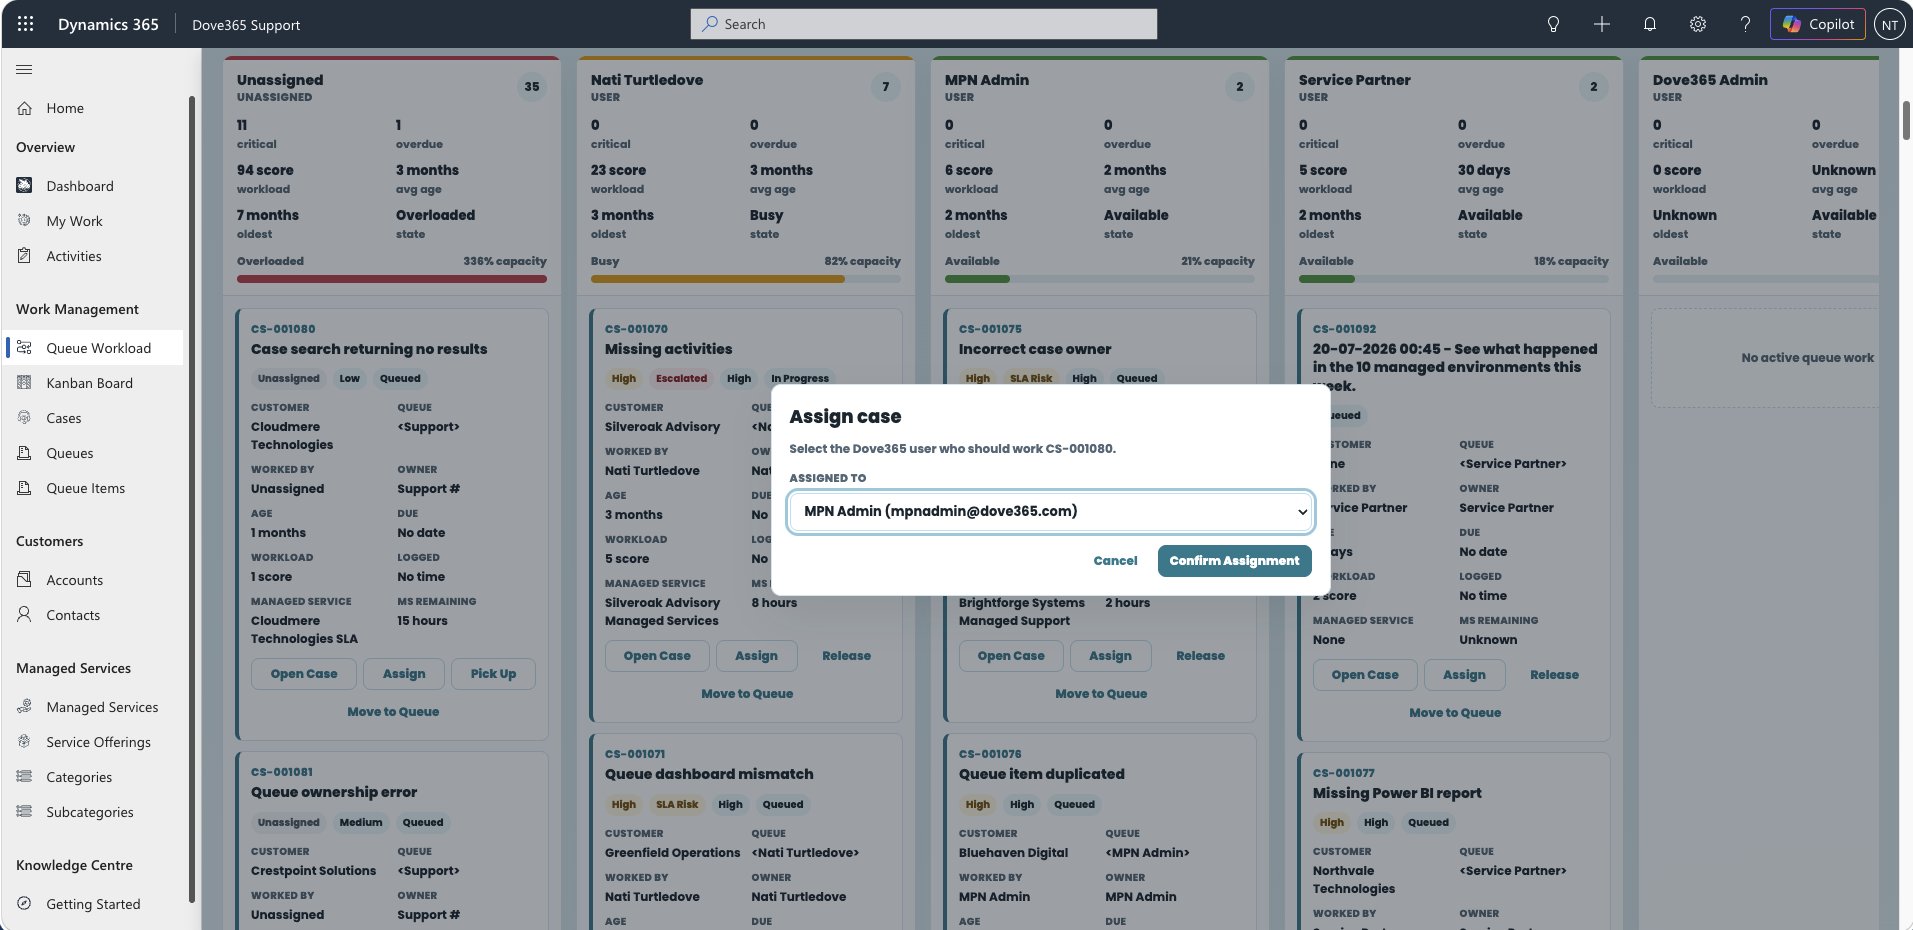
Assign a Case to a user
You can assign in two ways.
Using the button:
- Select
Assignon the card. - Select the user who should work the Case.
- Select
Confirm Assignment.
Using drag and drop:
- Drag the card into the target user's lane.
- Review the confirmation, which shows the target's current and projected workload.
- Select
Confirm Assignment.
When assignment is confirmed, Dove365 Support finds the target user's own queue, routes the Queue Item into that queue, sets Worked By on the Queue Item, and refreshes the card.
The confirmation warns you when the move will push the target above 100 per cent capacity. The warning does not block the move; it is there so overload is a decision rather than an accident. The user list comes from the Dove365 Users view.
If the target user has no queue of their own that Dove365 Support can read, the Case is not routed. Worked By is still set, so the assignment is recorded, but the Case remains in its current queue. The success message tells you which queue the Case was routed into.
Pick up a Case
Select Pick Up on any unassigned card to assign it to yourself. This follows exactly the same routing as an assignment to another user, so you also need a queue of your own for the Case to be routed correctly.
Assign to a team
Drag a card into a team lane to open the team dialogue. Worked By on a Queue Item is a single user lookup, so a Case cannot be assigned to a team as a whole. Choose either a member of that team, which assigns the Case to that person, or a queue owned by that team, which moves the Case into shared team work. If the team has no members and owns no queues, the dialogue tells you so and no action is available.
Move to another queue, or release
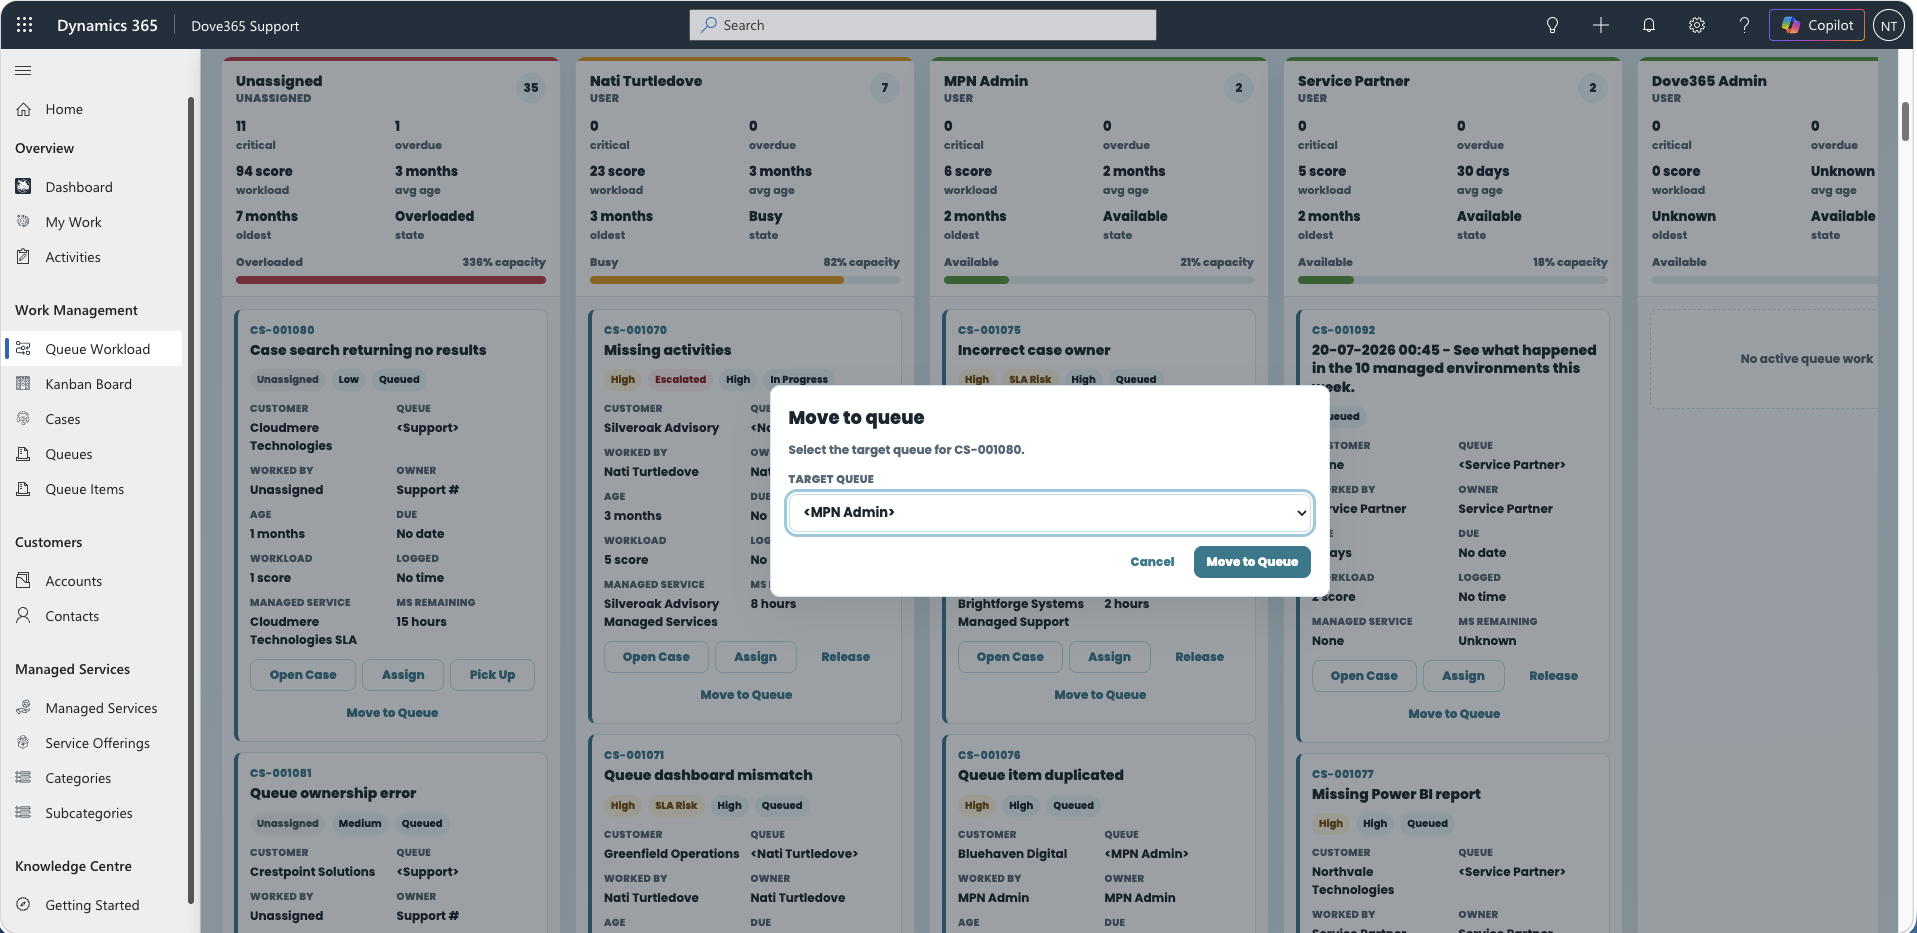
Move a Case to another queue
Select Move to Queue on a card, or drag the card into a queue lane while in By Queue mode, then choose the target queue.
Moving a Case to a queue does not change Worked By. Use this when work should change hands between queues but stays with the same person, or when work is being parked in a specialist queue for later triage.
Release a Case
Use Release when you are no longer working a Case and it should return to the pool.
- Select
Releaseon the card, or drag the card into theUnassignedlane. - Confirm the release.
Dove365 Support then moves the Queue Item into the configured default queue and clears Worked By. The Case appears in the Unassigned lane.
Release requires the default queue environment variable to be configured. If it is not, the board reports that no default queue is configured and the release does not proceed.
What the board shows you
The board is built from active Queue Items, not directly from Cases. It shows:
- Active Queue Items in public queues.
- Active Queue Items in queues you are a member of.
- Active Queue Items in the configured default queue.
- Active Queue Items worked by any Dove365 user, including work that has been routed into another user's own queue.
Only Queue Items that point to a Dove365 Case appear, and only active Cases are included. A Case can have more than one Queue Item; the board shows one card for each active Queue Item.
Admin requirements
Admins should confirm:
- The default queue environment variable
dove365_DefaultQueueGUIDhas a current value. Release depends on it. - Every support user has an active queue of their own, and is a member of that queue.
- Support users are members of the shared queues they are expected to manage.
- Support users have active Dataverse user records and appear in the Dove365 Users view.
- Users have permission to read Cases, read Queue Items, update Queue Items, and use the queue actions
AddToQueueandPickFromQueue. - Support teams are named so they can be identified, or own the queues they work.
- Cases carry a
Target Resolution Dateso workload urgency is meaningful. - The Queue Workload Board web resource is available in the Dove365 Support model-driven app.
Trouble shooting
A Case does not appear on the board
- Confirm the Case is active and has an active Queue Item.
- Confirm the Queue Item points to a Dove365 Case.
- Confirm you are a member of the queue holding the Queue Item, or that the queue is public.
- Clear the filters, including the
Include unassignedbox. - Select
Refresh Board.
Assignment succeeds but the Case does not reach the user's queue
- Confirm the user has an active queue of their own.
- Confirm the user is a member of that queue.
- Read the confirmation message on screen, which names the queue the Case was routed into.
- Ask an admin to confirm your permission to add records to that queue.
Assignment fails with an error
- Confirm the selected user is active and appears in the Dove365 Users view.
- Confirm you have permission to update the Queue Item.
- Confirm the Case is still active and has not been resolved by someone else.
- Select
Refresh Boardand try again. - Ask an admin to review browser console errors and Dataverse plugin or flow history.
A Case disappears from my board after I assign it
This is expected when the Case has been routed into a queue you cannot see and you have filtered the board. Clear the filters and select Refresh Board. If it is still missing, ask an admin whether you have read access to the target user's queue.
Release fails
- Confirm the default queue environment variable is configured with a current value.
- Confirm the default queue is active.
- Confirm you have permission to update the Queue Item.
A lane I expected to see is missing
- Check whether
Workload stateis set. It hides whole lanes that are not in the selected state. - Check the number beside the
Filtersheading. It shows how many filters are applied even when the panel is collapsed. - By User mode only shows users who are carrying visible work. Switch to Capacity View to see every active user.
- By Queue mode only shows queues that currently hold visible work.
Workload numbers look wrong
- Confirm the Cases have a
Target Resolution Dateand a priority. - Read the method note under the summary tiles, which lists the weights in use.
- Remember that
Average Workloadexcludes unassigned work and the default triage queue.
Continue learning
Kanban Board
Work the same queue items by support state: triage, assigned, in progress, and escalated.
Queues and Queue Items
Understand support intake, default queues, Worked By ownership, and picked work.
Admin and Configuration
Configure queues, queue membership, environment variables, and security roles.
Need help with Dove365 Support configuration?
Book a free call and get your questions answered directly by Dove365.